Table of Contents
A range hood, also known as an exhaust hood or kitchen hood, is a device containing a mechanical fan that hangs above the stove or cooktop in the kitchen. Its primary purpose is to ventilate airborne grease, combustion products, fumes, smoke, odors, heat, and steam from the air by evacuating and filtering it. When it comes to installation and functionality, the range hood height is more than just a number. It’s about ensuring effective ventilation and maintaining safety. In this blog, we will give you a guideline for the best practices to install your range hood for the best cooking experience.
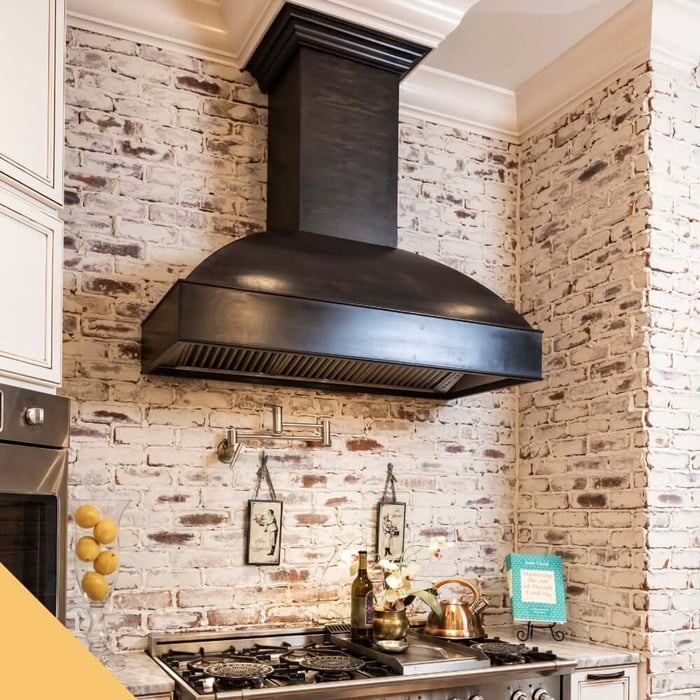
ZLINE Convertible Vent Wall Mount Range Hood in Black Stainless Steel (BSKBN)

$485.99
$539.99
The ZLINE Convertible Vent Wall Mount Range Hood in Black Stainless Steel (BSKBN) provides a professional culinary experience by pairing built-to-last quality with a timeless style. Achieve ZLINE Attainable Luxury® excellence with unrivaled performance that enhances your kitchen’s capabilities. This… Read More

Recommended Installation Heights
While you may think the bigger the range hood, the better the performance. However, proper installation is in fact the biggest determining factor of your range hood's functionality. The first thing to consider in terms of installation is the range hood height distance that will be needed from your cooktop to ensure the best performance.
Indoor Range Hoods:
The standard recommendation is to position the hood 24 to 30 inches above the cooktop for electric stoves and 24 to 36 inches above the cooktop for gas stoves. These measurements ensure optimal capture of cooking fumes while maintaining a safe distance to prevent heat damage to the hood.
Outdoor Range Hoods:
Often larger and more powerful, outdoor hoods should be installed slightly higher, typically around 36 inches above the grill, to accommodate the increased amount of smoke and heat generated by barbecue cooking. Additionally, your range hood should be larger than your grill or outdoor cooktop. For example, if the cooing surface is 30", the hood should be 36".
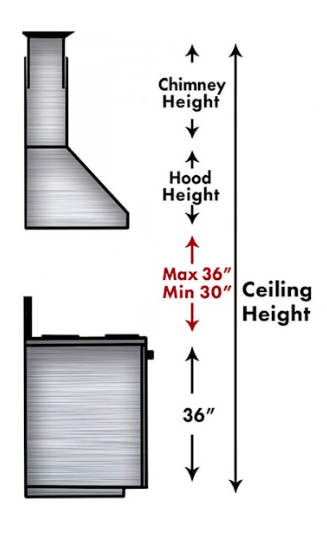
To account for differences in ceiling height, range hood dimensions, cooking surface height, and other factors, many manufacturers offer various chimney lengths to ensure their range hoods can be installed correctly. To find the right chimney length, you’ll need to first calculate the height of the ceiling.
Then, subtract the height of the hood, the height of the cooking surface, and the distance between the cooking surface and the hood from the height of the ceiling. Whatever distance is left will be the length of the chimney you need. The formula looks like this:
Floor to Ceiling height - Height of cooking surface - Clearance between cooking surface and bottom of hood - The Height of the hood's base = The Chimney height
Cooking Surfaces and What to Consider
The height from your cooktop to the range hood is important to maintain your cooking surface. Mounting your range hood too close to the cooktop can pose several risks.
Safety Concerns:
Excessive heat can damage the internal components of your hood, reducing its lifespan and efficiency. Something to consider is that heat damage due to improper installation may not be covered by some warranties.
Aesthetic Damage:
Grease and smoke can more easily stain the surface of the hood if it's too low, making it difficult to clean and maintain its appearance.
ZLINE, a leader in kitchen appliances, suggests an upper limit of 30-36 inches for most residential installations to ensure safety and functionality without compromising design aesthetics. Following these guidelines will help avoid these risks. We highly recommend choosing a ZLINE range hood for both power and beauty. Their range hoods also feature a 3 Year Parts and a Limited Lifetime Motor Warranty, putting your mind at ease when purchasing an essential appliance.
Types of Range Hoods and Their Installation Process
The installation process varies based on the type of range hood you choose. We highly recommend consulting with a professional to install your range hood; however, here's a basic outline of how to handle each mount type:
Wall-Mounted Range Hoods:
- Step 1: Measure and mark the center on the wall following the cooktop to range hood height recommendations
- Step 2: Install the mounting brackets or screws at the predetermined height. Preferably into the wall studs if they align
- Step 3: Mount the range hood and secure it to the brackets.
- Step 4: Install the transition piece
- Step 5: Plug in the range hood to make sure all the functions work
- Step 6: Attach ducting to the transition piece
- Step 7: Make electrical connections
- Step 8: Mount the chimney bracket
- Step 9: Connect ducting to the exhaust ducting in the ceiling
- If you have a recirculating range hood, you will not need to install ducting
- Step 10: Install chimney over ducting and power cords
- Step 11: Measure and trim the chimney if it is a one-piece
- Step 12: Install crown molding if included with your range hood
For the remaining range hood mount styles, the process will be similar. Here are the few steps that will need to be altered or added.
Under-Cabinet Hoods:
- Step 1: Remove the existing cabinet or prepare the space under the cabinet.
- Step 2: If not available, provide a path for the power cord to go through the bottom of the cabinet.
- Step 3: Install wooden spacers between the cabinet bottom and the top of the range hood if there is a recess.
- Step 4: Align the hood with the cabinets' bottom and secure with screws.
- Step 5: Proceed to Step 1 of the Wall-Mounted Range Hoods Installation.
Island Range Hoods:
- Step 1: Ensure the hood is centered directly above the island cooktop.
- Step 2: Once the location on the ceiling is determined, reinforcements or gussets will need to be installed between the ceiling joists to support the weight of the island range hood
- Step 3: A power outlet may need to be installed near the ceiling opening.
- Step 4: Adjust the range hood height based on your ceiling and cooktop type, typically higher due to the open nature of island setups.
- Step 5: Proceed to Step 1 of the Wall-Mounted Range Hoods Installation.
Ductless Range Hoods:
- Step 1: These are easier as they don’t require venting outside.
- Step 2: Mount at the recommended height, similar to ducted models, to ensure effective air filtration.
- Step 3: Install the charcoal filters before operating the range hood.
- Step 4: Proceed to Step 7 of the Wall-Mounted Range Hoods Installation.
Front Alignment vs. Extension
Whether the range hood should be flush with the front of the stove or extend beyond it depends largely on the style and functional design of the hood. Typically, extending slightly beyond the stove can capture more effluents from the front burners.

Conclusion
We encourage exploring our large variety of range hoods to find the perfect fit for your kitchen. Always prioritize safety and don’t hesitate to seek professional installation to ensure your range hood is set up for optimal performance and safety.
Ready to breathe easier in your kitchen? Consider these guidelines as you install your range hood, and never underestimate the power of proper ventilation! Always prioritize safety and don’t hesitate to seek professional installation to ensure your range hood is set up for optimal performance and safety.
If you have any more questions or need further assistance, you can contact one of our range hood experts using the link below. Happy cooking!
Connect with us on social media!
Facebook: The Range Hood Store
Instagram: @therangehoodstore
YouTube: The Range Hood Store
Pinterest: @TheRangeHoodStore
FAQs
What is the recommended height for installing a range hood?
For indoor installations, most manufacturers recommend mounting a range hood 24 to 30 inches above an electric cooktop and 24 to 36 inches above a gas cooktop. This range balances effective ventilation with heat safety and long-term hood performance.
Does range hood height really affect performance?
Yes. Installation height is one of the most important factors in how well a range hood works. A hood mounted too high may fail to capture smoke and grease effectively, while one mounted too low can suffer from heat damage and excessive grease buildup.
Are outdoor range hoods installed higher than indoor hoods?
Typically, yes. Outdoor range hoods are usually installed around 36 inches above the grill or cooking surface. Outdoor cooking produces more heat and smoke, and the added clearance helps manage airflow safely and effectively.
Should my range hood be wider than my cooktop or grill?
Ideally, yes. A range hood should be at least as wide as the cooking surface, and extending 3 to 6 inches wider on each side is recommended, especially for outdoor grills or high-output ranges. This improves smoke and grease capture.
What happens if a range hood is installed too low?
Installing a hood too close to the cooktop can expose it to excessive heat, which may damage internal components, reduce efficiency, and potentially void the manufacturer’s warranty. It can also lead to visible grease staining that is harder to clean.
Can installing a range hood too high cause problems?
Yes. A hood mounted too high may struggle to pull smoke, steam, and odors into the capture area. This can result in lingering smells, grease buildup in the kitchen, and reduced overall ventilation performance.
How do I calculate the correct chimney length for my ceiling height?
To calculate chimney length, subtract the height of the cooking surface, the required clearance between the cooktop and hood, and the height of the hood itself from the total floor-to-ceiling height. The remaining measurement determines the chimney length needed.
Does the type of cooktop affect hood installation height?
Absolutely. Gas cooktops typically require greater clearance due to open flames and higher heat output, while electric and induction cooktops can be installed slightly lower. Always follow manufacturer-specific guidelines.
Are installation steps different for wall-mounted, island, and under-cabinet hoods?
Yes. Wall-mounted hoods require securing to wall studs, island hoods need ceiling reinforcement, and under-cabinet hoods may require cabinet modification or spacers. Each style has unique structural and electrical considerations.
Do ductless range hoods have different height requirements?
Ductless hoods are generally installed at the same recommended heights as ducted models. Proper height is still essential for effective filtration, even though air is recirculated rather than vented outside.
Should a range hood be flush with the front of the stove or extend past it?
Extending the hood slightly beyond the front burners often improves capture efficiency, especially for front-heavy cooking. Some designs are flush for aesthetic reasons, but extension can enhance performance.
Do manufacturers provide specific installation guidelines?
Yes. Brands such as ZLINE provide detailed installation recommendations, including height ranges, chimney options, and mounting requirements. Following these guidelines helps protect warranties and ensure optimal performance.
Is professional installation recommended for range hoods?
While experienced DIYers can install some models, professional installation is strongly recommended. Proper mounting, ducting, electrical connections, and clearance compliance are critical for safety and long-term performance.
What is the biggest mistake people make when installing a range hood?
The most common mistake is focusing on hood size or power while overlooking proper installation height. Even a high-quality range hood will underperform if it is mounted at the wrong distance from the cooktop.